
Custom nodes are nodes inside actions that you can create. You can use them to structure your algorithm or to reuse parts of your algorithm (so you don’t have to create the same set of nodes with the same connections multiple times).
Custom nodes are available only within an action. To make the node you created available for use in other actions, you must convert it to a library node.
Create a custom node #
You can create a custom node inside the ActionNodes Editor (when editing an action). There are several ways to do this:
- Create from scratch. To do this, click the New custom node button
 on the toolbar above the Nodes Area in the ActionNodes editor. You can also right-click on the Custom Nodes item in the Nodes List panel and choose Add new custom node… from the context menu that appears.
 - Convert an existing part of the action algorithm, consisting of nodes connected by connections, into a custom node. To do this, select the nodes you want to convert and click the New custom node from selection button
 on the toolbar above the Nodes Area in the ActionNodes editor. After saving such a node and closing the Custom Nodes Editor, all selected nodes will be replaced by the newly created custom node with all connections preserved. Try not to change the identifiers of the input and output parameters (which are automatically generated by ActionNodes) when creating a custom node in this way, otherwise after saving the custom node and closing the editor, some connections to this node may not be automatically created.
 - Paste a node from the clipboard by right-clicking on the Custom Nodes item in the Nodes List panel of the ActionNodes Editor and selecting Paste custom node from the context menu that appears.
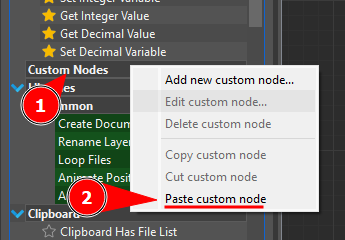
You can paste any previously copied custom or library node. To copy a custom node, move the mouse over the desired custom node in the Nodes List panel, right-click on it, and select Copy custom node or Cut custom node from the context menu that appears. In the same way, to copy a library node, move the mouse pointer over the desired library node, right-click on it, and choose Copy library node from the context menu that appears.


Convert custom node to library node #
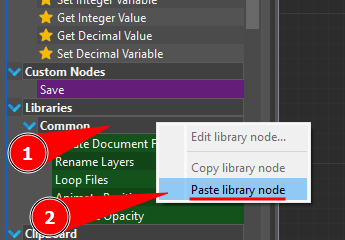
To convert the custom node to the library node, move the mouse over the desired custom node in the Nodes List panel, right-click on it, and select Copy custom node or Cut custom node from the context menu that appears. After that move the mouse over the desired library on the Nodes List panel, right-click on it, and select Paste library node in the context menu that appears.
Custom Node Editor #
If you decide to create a custom node from scratch or convert a set of connected nodes into a custom node, you will see the Custom Node Editor.
The Custom Node Editor is similar to the ActionNodes Editor in many ways. But it also has many differences.
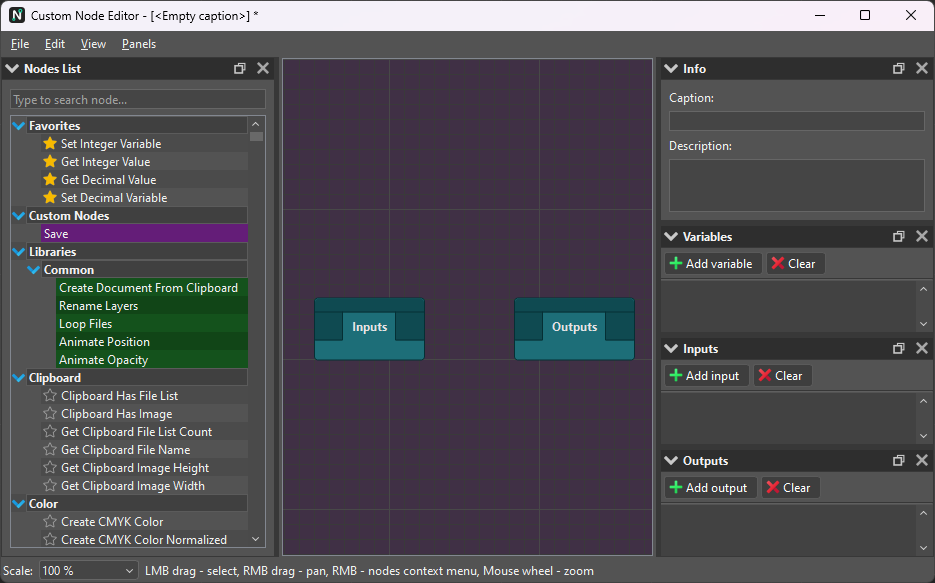
First of all, the editor window, like the ActionNodes Editor window, is also divided into 4 areas: Main Menu, Nodes area, Panels and Status Bar.
However, the Nodes Area does not have a toolbar, and the basic node is not the Start node, but the Inputs node and the Outputs node.
The panels also have differences. In the Nodes List panel, you cannot manage custom or library nodes (copy, paste, or delete them). In the Info panel, you can enter only a caption and description. And instead of the Parameters panel, there is the Inputs panel, which has the same functionality. There is also a new panel – Outputs, where you can configure the list of output ports of the custom node. The functionality of the Outputs panel is the same as in the Variables panel, except that in the Outputs panel you can also set a Caption for each item that will be displayed near the corresponding output port of the custom node (if no caption is specified, the value from the Identifier field will be displayed instead).
In custom nodes, you can use both library nodes and custom nodes. You can also use the same custom node you’re editing in recursive calls, but be very careful not to create infinite loops or deadlocks (it’s your responsibility to avoid these situations, as ActionNodes doesn’t track such events).


